In the previous blogs, details about the Software installation, marker creation, 3D Model and links to resources were posted.
Now to understand how this works please review:
The following is the Code (Not final version - Needs tuning for performance and some changes to include the overall scope of the project ) for the Interactive Strory Telling Project - Myths from Amazon.
(Thanks to the developers that support open source and posted sample code at various sites.
The sample code from: http://gotoandlearn.com/ was used as the basis for this project)
Code
------
package {
/**
* ...
* @author Suresh
*/
import away3d.events.VideoEvent;
import com.transmote.flar.FLARManager;
import com.transmote.flar.marker.FLARMarkerEvent;
import com.transmote.utils.time.FramerateDisplay;
import com.transmote.flar.marker.FLARMarker;
import com.transmote.flar.utils.geom.FLARPVGeomUtils;
// Basic
import org.libspark.flartoolkit.support.pv3d.FLARCamera3D;
import org.papervision3d.lights.PointLight3D;
import org.papervision3d.objects.DisplayObject3D;
import org.papervision3d.objects.parsers.DAE;
import org.papervision3d.render.LazyRenderEngine;
import org.papervision3d.scenes.Scene3D;
import org.papervision3d.view.Viewport3D;
import org.papervision3d.materials.MovieMaterial;
import org.papervision3d.objects.primitives.Plane;
import org.papervision3d.materials.BitmapMaterial;
import org.papervision3d.events.InteractiveScene3DEvent;
import flash.display.Sprite;
import flash.events.Event;
//For Video
//import fl.video.*;
/**
* ...
* @author Suresh
*/
// http://code.google.com/p/tweener/
import caurina.transitions.Tweener;
[SWF(width="640", height="480", frameRate="40", backgroundColor="#FFFFFF")]
public class Story3DAnimationMyths extends Sprite {
private var fm:FLARManager;
private var scene:Scene3D;
private var camera:FLARCamera3D;
private var view:Viewport3D;
private var lre:LazyRenderEngine;
private var marker0:FLARMarker;
private var marker1:FLARMarker;
private var marker2:FLARMarker;
private var marker3:FLARMarker;
//private var marker4:FLARMarker;
//private var marker5:FLARMarker;
//private var marker6:FLARMarker;
private var marker7:FLARMarker;
private var marker8:FLARMarker;
private var marker9:FLARMarker;
private var marker10:FLARMarker;
private var marker11:FLARMarker;
private var marker12:FLARMarker;
private var container0:DisplayObject3D;
private var container1:DisplayObject3D;
private var container2:DisplayObject3D;
private var container3:DisplayObject3D;
//private var container4:DisplayObject3D;
//private var container5:DisplayObject3D;
//private var container6:DisplayObject3D;
private var container7:DisplayObject3D;
private var container8:DisplayObject3D;
private var container9:DisplayObject3D;
private var container10:DisplayObject3D;
private var container11:DisplayObject3D;
private var container12:DisplayObject3D;
private var pointLight:PointLight3D;
private var p:Plane;
private var v:Vid;
private var p2:Plane;
private var v2:Vid;
private var planeWidth:uint = 320;
private var planeHeight:uint = 240;
private var quality:uint = 8;
//[Embed (source = "../src/media/Butterfly.swf")]
//[Embed (source = '../src/media/Butterfly.swf')]
public function Story3DAnimationMyths() {
initFLAR();
v = new Vid();
v.vid.source = "../src/kramer.m4v";
v.vid.stop();
v2 = new Vid();
v2.vid.source = "../src/media/ODYSSEY.mov";
v2.vid.stop();
}
private function initFLAR():void
{
fm = new FLARManager("flarConfig.xml");
fm.addEventListener(FLARMarkerEvent.MARKER_ADDED, onAdded);
fm.addEventListener(FLARMarkerEvent.MARKER_REMOVED, onRemoved);
fm.addEventListener(Event.INIT, init3D);
addChild(Sprite(fm.flarSource));
}
private function onAdded(e:FLARMarkerEvent):void
{
trace("Added");
trace(e.marker.patternId.toString());
if ( e.marker.patternId == 0 ) {
marker0 = e.marker;
container0.visible = true;
} else if ( e.marker.patternId == 1 ){
marker1 = e.marker;
container1.visible = true;
} else if ( e.marker.patternId == 2 ){
marker2 = e.marker;
container2.visible = true;
} else if ( e.marker.patternId == 3 ){
marker3 = e.marker;
container3.visible = true;
} /* else if ( e.marker.patternId == 4 ){
marker4 = e.marker;
container4.visible = true;
} else if ( e.marker.patternId == 5 ){
marker5 = e.marker;
container5.visible = true;
} else if ( e.marker.patternId == 6 ){
marker6 = e.marker;
container6.visible = true;
} */ else if ( e.marker.patternId == 7 ){
marker7 = e.marker;
container7.visible = true;
} else if ( e.marker.patternId == 8 ){
marker8 = e.marker;
container8.visible = true;
} else if ( e.marker.patternId == 9 ){
marker9 = e.marker;
container9.visible = true;
} else if ( e.marker.patternId == 10 ){
marker10 = e.marker;
container10.visible = true;
} else if ( e.marker.patternId == 11 ){
marker11 = e.marker;
p.visible = true;
v.vid.play();
container11.visible = true;
} else if ( e.marker.patternId == 12 ){
marker12 = e.marker;
container12.visible = true;
} else {
//nomarker
}
}
private function onRemoved(e:FLARMarkerEvent):void
{
trace("Removed");
trace(e.marker.patternId.toString());
if ( e.marker.patternId == 0 ) {
marker0 = null;
container0.visible = false;
} else if ( e.marker.patternId == 1 ){
marker1 = null;
container1.visible = false;
} else if ( e.marker.patternId == 2 ){
marker2 = null;
container2.visible = false;
} else if ( e.marker.patternId == 3 ){
marker3 = null;
container3.visible = false;
} /*else if ( e.marker.patternId == 4 ){
marker4 = null;
container4.visible = false;
} else if ( e.marker.patternId == 5 ){
marker5 = null;
container5.visible = false;
} else if ( e.marker.patternId == 6 ){
marker6 = null;
container6.visible = false;
} */ else if ( e.marker.patternId == 7 ){
marker7 = null;
container7.visible = false;
} else if ( e.marker.patternId == 8 ){
marker8 = null;
container8.visible = false;
} else if ( e.marker.patternId == 9 ){
marker9 = null;
container9.visible = false;
} else if ( e.marker.patternId == 10 ){
marker10 = null;
container10.visible = false;
} else if ( e.marker.patternId == 11 ){
marker11 = null;
p.visible = false;
v.vid.stop();
container11.visible = false;
} else if ( e.marker.patternId == 12 ){
marker12 = null;
container12.visible = false;
} else {
//nomarker
}
}
private function init3D(e:Event):void
{
/**
* ...
* @author Suresh
*/
scene = new Scene3D();
camera = new FLARCamera3D(fm.cameraParams);
camera.z = -30;
view = new Viewport3D(640, 480, true);
lre = new LazyRenderEngine(scene, camera, view);
var mat:MovieMaterial = new MovieMaterial(v, false, true);
p = new Plane(mat, 320, 240, 2, 2);
p.scaleY = -1;
p.rotationZ = 90;
p.visible = false;
var mat2:MovieMaterial = new MovieMaterial(v2, false, true);
p2 = new Plane(mat2, 320, 240, 2, 2);
p2.scaleY = -1;
p2.rotationZ = 90;
p2.visible = false;
pointLight = new PointLight3D();
pointLight.x = 1000;
pointLight.y = 1000;
pointLight.z = -1000;
// load the model.
// Model may have to be scaled and rotated to fit the marker; every model is different.
var model0:DAE = new DAE(true, "model", true);
var model1:DAE = new DAE(true, "model", true);
var model2:DAE = new DAE(true, "model", true);
var model3:DAE = new DAE(true, "model", true);
//var model4:DAE = new DAE(true, "model", true);
//var model5:DAE = new DAE(true, "model", true);
//var model6:DAE = new DAE(true, "model", true);
var model7:DAE = new DAE(true, "model", true);
var model8:DAE = new DAE(true, "model", true);
var model9:DAE = new DAE(true, "model", true);
var model10:DAE = new DAE(true, "model", true);
//var model11:DAE = new DAE(true, "model", true);
//var model12:DAE = new DAE(true, "model", true);
model0.load("../src/Models/Blender2Banana.dae");
model0.scale = 8.0;
model0.rotationX = 30;
model0.rotationY = 45;
model0.rotationZ = 45;
model1.load("../src/Models/corn.dae");
model1.rotationZ = 270;
model1.scale = 4.0;
model2.load("../src/Models/BlenderCroc.dae");
model2.scale = 14.0;
model2.rotationZ = 270;
model3.load("../src/Models/BlenderPinkDolphin.dae");
model3.scale = 12.0;
model3.rotationX = 180;
model3.rotationY = 90;
model3.rotationZ = 90;
//model4.load("../src/Models/EarCorn.dae"); // For now EarCorn.pat is attached
//model5.load("../src/Models/Fire.dae");
//model6.load("../src/Models/Fish.dae");
model7.load("../src/Models/hut.dae");
model7.rotationZ = 270;
model7.rotationX = 90;
model8.load("../src/Models/BlenderPalmTree.dae");
model8.scale = 12.0;
model8.rotationZ = 270;
model9.load("../src/Models/BlenderPlantain.dae");
model9.scale = 12.0;
//model9.rotationY = 180;
model10.load("../src/Models/scout.dae");
//model11.load("../src/Models/movie.dae");
//model12.load("../src/Models/Snake.dae");
//To Test Video commenting the following
container0 = new DisplayObject3D();
container0.addChild(model0);
container0.visible = false;
scene.addChild(container0);
container1 = new DisplayObject3D();
container1.addChild(model1);
container1.visible = false;
scene.addChild(container1);
container2 = new DisplayObject3D();
container2.addChild(model2);
container2.visible = false;
scene.addChild(container2);
container3 = new DisplayObject3D();
container3.addChild(model3);
container3.visible = false;
scene.addChild(container3);
//container4 = new DisplayObject3D();
//container4.addChild(model4);
//container4.visible = false;
//scene.addChild(container4);
container7 = new DisplayObject3D();
container7.addChild(model7);
container7.visible = false;
scene.addChild(container7);
container8 = new DisplayObject3D();
container8.addChild(model8);
container8.visible = false;
scene.addChild(container8);
container9 = new DisplayObject3D();
container9.addChild(model9);
container9.visible = false;
scene.addChild(container9);
container10 = new DisplayObject3D();
container10.addChild(model10);
container10.visible = false;
scene.addChild(container10);
container11 = new DisplayObject3D();
container11.addChild(p);
scene.addChild(container11);
container12 = new DisplayObject3D();
container12.addChild(p2);
scene.addChild(container12);
addChild(view);
//addChild(new FramerateDisplay());
addEventListener(Event.ENTER_FRAME, loop);
}
private function loop(e:Event):void
{
if (marker0 != null)
{
container0.transform = FLARPVGeomUtils.convertFLARMatrixToPVMatrix(marker0.transformMatrix);
}
if (marker1 != null)
{
container1.transform = FLARPVGeomUtils.convertFLARMatrixToPVMatrix(marker1.transformMatrix);
}
if (marker2 != null)
{
container2.transform = FLARPVGeomUtils.convertFLARMatrixToPVMatrix(marker2.transformMatrix);
}
if (marker3 != null)
{
container3.transform = FLARPVGeomUtils.convertFLARMatrixToPVMatrix(marker3.transformMatrix);
}
/*if (marker4 != null)
{
container4.transform = FLARPVGeomUtils.convertFLARMatrixToPVMatrix(marker4.transformMatrix);
}*/
if (marker7 != null)
{
container7.transform = FLARPVGeomUtils.convertFLARMatrixToPVMatrix(marker7.transformMatrix);
}
if (marker8 != null)
{
container8.transform = FLARPVGeomUtils.convertFLARMatrixToPVMatrix(marker8.transformMatrix);
}
if (marker9 != null)
{
container9.transform = FLARPVGeomUtils.convertFLARMatrixToPVMatrix(marker9.transformMatrix);
}
if (marker10 != null)
{
container10.transform = FLARPVGeomUtils.convertFLARMatrixToPVMatrix(marker10.transformMatrix);
}
if (marker11 != null)
{
container11.transform = FLARPVGeomUtils.convertFLARMatrixToPVMatrix(marker11.transformMatrix);
}
if (marker12 != null)
{
container12.transform = FLARPVGeomUtils.convertFLARMatrixToPVMatrix(marker12.transformMatrix);
}
lre.render();
}
}
}
----------------
-Suresh
Monday, November 9, 2009
Wednesday, November 4, 2009
3D Models for our Project
Creating and Using 3D Models
We downloaded several models that suite our Project from Google's 3D Warehouse.
We modified them to our needs using Google Sketchup and then converted those Models to .3ds Models (Using Export feature of Google Sketchup Pro)
Note:
-------
Though .3DS, Collada, .KMZ files and many other 3D Model formats are supported by FLARToolKit and FLARManager, we choose to use Collada (.dae extension file names), version 4
Models as many code samples were/are available in the web for Collada Models.
---------
Using Blender (Program from www.blender.org) we imported the .3DS models, saved them as blender files and then converted them to Collada models using the Export option.
These Collada Models (From 3D Warehouse to .3DS to .dae) were/are used for the Project.
Note:
-------
After converting to .dae files, open the .dae file using notepad (or any text editor or your choice) and search for .jpg or .png files.
These are the Texture of the 3D Model. You have to make sure the Texture ( .jpg or .png) files exist in the directory path specified in the .dae file. You can modify the path if needed.
e.g.
original value (after exporting from .3ds to .dae using Blender)
<init_from>..\images\3ds\banana1.jpg</init_from>
After manual editing (Editing with text editor)
<init_from>banana1.jpg</init_from>
------------
Note: The path to the image texture file created in the .dae file can be absolute (e.g. C:\Project\..\..\images\3ds\banana1.jpg) or relative (e.g. \images\3ds\banana1.jpg) depending on the option you choose with the export using Blender. (Please choose relative at that time of export)
After manually editing the path to say
<init_from>banana1.jpg</init_from>
make sure the file banana1.jpg is in the same dir as the .dae file (say banana3d.dae).
------------
- Suresh
Markers with Patterns
1. To create your own markers please review the following:
http://flash.tarotaro.org/blog/2009/07/12/mgo2/
2. To have an understanding about Markers please review "Marker File" in
http://www.mikkoh.com/blog/2008/12/05/flartoolkitflash-augmented-realitygetting-started/
Note:
You can use Paint Brush, Adobe Photshop, Gimp etc (any tool you are comfortable) to create the images/pattern for the markers.
Save the file as .jpg or .png with not greater than 278 X 278 pixel.
Then print a copy of the images/pattern.
Use the online marker generator at http://flash.tarotaro.org/blog/2009/07/12/mgo2/
to generate the Marker Pattern (.pat extension) file. (You can either use the printed copy and a Web cam to get the .pat file or use the saved .jpg or .png file to get the .pat file using the online Marker generator Program)
For good performance and easy tracking:
- Have the outer Black square about 80mm and the inner White Square about 40mm.
- If you use the online maker from the link given in item 1 above, choose 8X8 as the Marker Size.
Also if you want to use a stored .jpg or .png file with the image/pattern to make the Marker (.pat file) using the online maker program given in the URL of item 1 above, make sure the Pixel size is less than 278 X 278 for the program to fully select your Pattern as a Marker.
Example of the Marker images that our team member Esme created for the Project are shown here: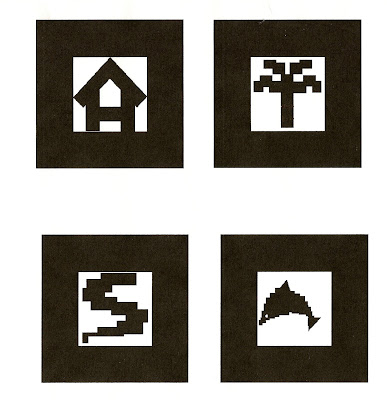
Note: The Picture shows 4 different Markers used in the Project to track 4 different 3D Objects.
-Suresh
http://flash.tarotaro.org/blog/2009/07/12/mgo2/
2. To have an understanding about Markers please review "Marker File" in
http://www.mikkoh.com/blog/2008/12/05/flartoolkitflash-augmented-realitygetting-started/
Note:
You can use Paint Brush, Adobe Photshop, Gimp etc (any tool you are comfortable) to create the images/pattern for the markers.
Save the file as .jpg or .png with not greater than 278 X 278 pixel.
Then print a copy of the images/pattern.
Use the online marker generator at http://flash.tarotaro.org/blog/2009/07/12/mgo2/
to generate the Marker Pattern (.pat extension) file. (You can either use the printed copy and a Web cam to get the .pat file or use the saved .jpg or .png file to get the .pat file using the online Marker generator Program)
For good performance and easy tracking:
- Have the outer Black square about 80mm and the inner White Square about 40mm.
- If you use the online maker from the link given in item 1 above, choose 8X8 as the Marker Size.
Also if you want to use a stored .jpg or .png file with the image/pattern to make the Marker (.pat file) using the online maker program given in the URL of item 1 above, make sure the Pixel size is less than 278 X 278 for the program to fully select your Pattern as a Marker.
Example of the Marker images that our team member Esme created for the Project are shown here:

Note: The Picture shows 4 different Markers used in the Project to track 4 different 3D Objects.
-Suresh
Testing Basic Setup
After you have installed and setup as given in the previous post, review the
Loading Collada Models example in
http://words.transmote.com/wp/flarmanager/inside-flarmanager/loading-collada-models/
Run the example in your computer and make sure you see the scout march at standing position.
If this works then you have the basic setup.
-Suresh
Loading Collada Models example in
http://words.transmote.com/wp/flarmanager/inside-flarmanager/loading-collada-models/
Run the example in your computer and make sure you see the scout march at standing position.
If this works then you have the basic setup.
-Suresh
Installation and Setup for the VR Project
I. Using Flex Builder
1. If you want to use Flex Builder please follow the 7 Steps given under Quick Start in the link
http://words.transmote.com/wp/flarmanager/inside-flarmanager/getting-started/
II. Using Flash Develop (Note you need Flex Builder also indirectly)
2. If you want to use Flash Build please follow the steps given in the link:
http://www.fatalerror.fr/2009/09/flashdevelop-et-flarmanager.html
The literature in above link is in French.
The following is its translation in English:
Saturday, September 5, 2009
FlashDevelop and FLARManager
As promised here's how to install and configure FlashDevelop to work with FLARManager.
Our goal is to "compile" the package example FLARManager v06. Most blogs you say FLARManager v05 can not run under FlashDevelop "It is not really a solution." Implied, we must work with Flex Builder. Perhaps, but there is a possibility. Here it is.
Install FlashDevelop
Go to the FlashDevelop.org site and download the latest version in the category 'All Downloads'.
http://www.flashdevelop.org/community/viewforum.php?f=11
Double-click the installer, follow the instruction. FlashDevelop is installed.
Installing Flex 3 SDK
Go to the Adobe site and download the Latest Milestone Release Build from the Adobe Flex SDK:
http://opensource.adobe.com/wiki/display/flexsdk/Download+Flex+3
Create a directory named flexsdk in the Tools directory of FlashDevelop
(C:\Program Files\FlashDevelop\Tools).
Unzip the downloaded archive into the newly created directory.
Install Flash 10 Debugger
http://www.adobe.com/support/flashplayer/downloads.html
Personally, I downloaded the full package (flash_player_update3_flash10.zip) and I installed all debuggers.
Setting up FlashDevelop to FLARManager v06 (and reverse)
Go to http://words.transmote.com/wp/flarmanager/
and download FLARManager v06 from download FLARManager
Unzip in a temporary directory (I'll call "source").
Open FlashDevelop and create a new AS3 project (I'll call the project).
You should have three directories in the project: bin, lib and src.
You will transfer files and directories from the source to the project:
- html_doc => bin
- resources => at the root of the project (ideally later to put your resources and assets in bin)
- files in libs => lib
- files in src => src
In FlashDevelop, right-click each *. swc files in lib and choose "Add to library"
Finally right-click
src /FLARManagerExampleLauncher.as and select "Always Compile".
You can delete your Main.as
Project window should look like this image: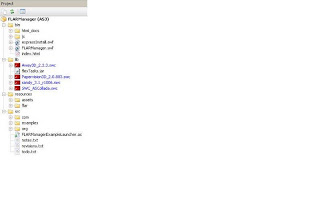
In the top menu, choose Project > Properties and change the values:
- Target: "Flash Player 10”
- Test Movie:" Play in external player "
Save.
In the top menu,
choose Project > Test Movie (F5)
Enjoy!
- Suresh
1. If you want to use Flex Builder please follow the 7 Steps given under Quick Start in the link
http://words.transmote.com/wp/flarmanager/inside-flarmanager/getting-started/
II. Using Flash Develop (Note you need Flex Builder also indirectly)
2. If you want to use Flash Build please follow the steps given in the link:
http://www.fatalerror.fr/2009/09/flashdevelop-et-flarmanager.html
The literature in above link is in French.
The following is its translation in English:
Saturday, September 5, 2009
FlashDevelop and FLARManager
As promised here's how to install and configure FlashDevelop to work with FLARManager.
Our goal is to "compile" the package example FLARManager v06. Most blogs you say FLARManager v05 can not run under FlashDevelop "It is not really a solution." Implied, we must work with Flex Builder. Perhaps, but there is a possibility. Here it is.
Install FlashDevelop
Go to the FlashDevelop.org site and download the latest version in the category 'All Downloads'.
http://www.flashdevelop.org/community/viewforum.php?f=11
Double-click the installer, follow the instruction. FlashDevelop is installed.
Installing Flex 3 SDK
Go to the Adobe site and download the Latest Milestone Release Build from the Adobe Flex SDK:
http://opensource.adobe.com/wiki/display/flexsdk/Download+Flex+3
Create a directory named flexsdk in the Tools directory of FlashDevelop
(C:\Program Files\FlashDevelop\Tools).
Unzip the downloaded archive into the newly created directory.
Install Flash 10 Debugger
http://www.adobe.com/support/flashplayer/downloads.html
Personally, I downloaded the full package (flash_player_update3_flash10.zip) and I installed all debuggers.
Setting up FlashDevelop to FLARManager v06 (and reverse)
Go to http://words.transmote.com/wp/flarmanager/
and download FLARManager v06 from download FLARManager
Unzip in a temporary directory (I'll call "source").
Open FlashDevelop and create a new AS3 project (I'll call the project).
You should have three directories in the project: bin, lib and src.
You will transfer files and directories from the source to the project:
- html_doc => bin
- resources => at the root of the project (ideally later to put your resources and assets in bin)
- files in libs => lib
- files in src => src
In FlashDevelop, right-click each *. swc files in lib and choose "Add to library"
Finally right-click
src /FLARManagerExampleLauncher.as and select "Always Compile".
You can delete your Main.as
Project window should look like this image:

In the top menu, choose Project > Properties and change the values:
- Target: "Flash Player 10”
- Test Movie:" Play in external player "
Save.
In the top menu,
choose Project > Test Movie (F5)
Enjoy!
- Suresh
Monday, November 2, 2009
VR for the Myths Project for Interactive Story Telling
Links and resources
----------------------
1. FLARManager download
http://words.transmote.com/wp/flarmanager/
2. FlashDevelop 3.0.5 RTM
http://www.flashdevelop.org/wikidocs/index.php?title=Main_Page
3. Online Marker Generator
http://flash.tarotaro.org/blog/2009/07/12/mgo2/
4. Google Sketchup and 3D Warehouse for 3D objects
http://sketchup.google.com/download/plugins.html
http://sketchup.google.com/3dwarehouse/
5. Blender to create, convert and edit 3D objects
http://www.blender.org/
6. Tutorials and Videos
6.1. Inside FLARManager: Getting Started
http://words.transmote.com/wp/flarmanager/inside-flarmanager/getting-started/
6.2. Excellent Video on Basics of VR and Video with FLARManager
http://gotoandlearn.com/play?id=105
http://gotoandlearn.com/play?id=114
7. FLARToolkit - upon which FLARManager is build.
Note: For historic purpose only. You do not have to download anything from here.
http://saqoosha.net/en/flartoolkit/start-up-guide/
http://www.mikkoh.com/blog/2008/12/05/flartoolkitflash-augmented-realitygetting-started/
----------------
- Suresh
Interactive Story Telling Project
Interactive Story Telling Project
Virtual Reality with Stories
----------------------------
For the Interactive Story Telling Class we had to do a Project. There were 5 in the Project and one dropped out from the class. Four of us discussed several ideas and settled for a Project based on Myths like "The Myth of the American Dream" or "The Myths About the Origin of the World" in various Cultures etc. As one of the team members has worked in the Amazon and was actively working on some exibits related to Amazon we choose to do the project related to "Myths from the Amazon", "Myths from the Africa", "Myths from the India", and "Myths from the Australia" as a comparison of how the Myths varied on a specific topic (Origins of World) from different regions of the World. We wanted to tie this up some how to Google Earth.
As our discussions went by we decided to start with "Myths from the Amazon" as this will help us show our work in a near by Museum, where one of the Project team member was about to present her work with the Amazon tribes. One of the Class Mates, Ed, showed us some interesting things about Virtual Reality. This facinated us and hence we decided to tie our "Myths from the Amazon Interactive Story Telling" Project with Virtual Reality. So Google Earth was off the Project for now.
Amazon Queen a member of the team who worked in the Amazon gave the Myths for the Project.
Esme, well versed in literature, arts, ornament design, puppet making, effeciently created the story books for the Myth, markers for VR and "Story Board" for the Project.
Max who was good at creating beautiful pictures and Scenes created beautiful pictures using Photshop for the Project.
We started using BuildAR (A tool for Virtual Reality -VR) as our Classmate Ed used BuildAR to demonstrate VR. As we found BuildAR crashed often and did not have many aspects of what we wanted, I hunted the web for various alternative SW for VR and found FLARToolkit and FLARManager.So we decided to do the VR aspects of the Project with FLARManager that uses FLARToolkit and Adobe Flex.
As we could not afford to purchase SW, our motto was to use Open Source free SW as much as possible. Our course teacher, Arturo an expert in Movies and Games, suggested we use FlashBuild as an alternative to Adobe Flex.So after searching the web for solutions and how to, I was able to get the basic VR for our Project. With this Intro, in the next few Blogs I like to share how the various pieces came together.
-Suresh
Subscribe to:
Posts (Atom)
